• Home
  • In the Garden
  • Life & Faith
  • Nav Social Menu

    • Facebook
    • Instagram
    • Pinterest
    • Twitter
    • YouTube

The Beginner's Garden

Helping Beginners Grow a Rewarding, Successful Garden

  • Home
  • Meet Jill
  • Blog
  • The Beginner’s Garden Podcast
  • Speaking
  • Shop
  • Contact

Is it better to stake or cage tomatoes?

in Garden Planning· Gardening Tips & How-to's· In the Garden· Spring Garden· Summer Garden· The Beginner's Garden Podcast· Tomatoes· Vegetables· Vegetables

FacebookTwitterPinterestLinkedInEmail

My journey to the ideal tomato trellis system has not been an easy one. It started with using a flimsy round “tomato cage,” which couldn’t bear the weight of my vining tomato plant loaded with fruit.

Then, I turned to the Florida Weave method. This worked beautifully for my Roma tomatoes but not the vining, indeterminate varieties.

Finally, I decided to try two other popular methods — tomato staking using a trellis system and a heavy duty professional tomato cage. Then I tested each method and took detailed notes on the yields of each.

In this episode of the Beginner’s Garden Podcast and in the article below, I share the results of my testing. You’ll learn the benefits and drawbacks of both the single-stem tomato staking method and the heavy duty tomato cage. By the end, you’ll see which one I settled on and why.

Click below to listen or read the article below.

pros and cons of tomato staking and tomato cages

Tomato Stakes vs. Tomato Cages

Before I talk about the single-stem tomato staking method and the heavy duty tomato cage, I need to return back to the second method I referenced above — the Florida Weave.

I still use the Florida Weave for my Roma tomatoes for so many reasons. If you’re growing Romas or any other determinate tomato, I urge you to read this post.

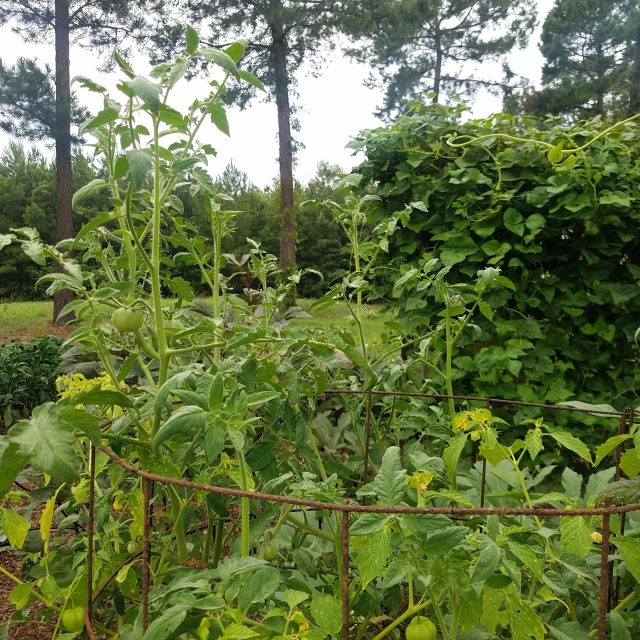
But if you’re growing vining, indeterminate tomatoes, you probably want something that can handle these larger varieties.

Single-Stem Tomato Stake Using T-Posts, PVC, and Rebar

A single stem tomato staking method requires that you train the tomato plant to one main stem. You also will want to prune most or all of the suckers. You can do this many ways — one of the easiest being to train and tie each plant to one tall tomato stake.

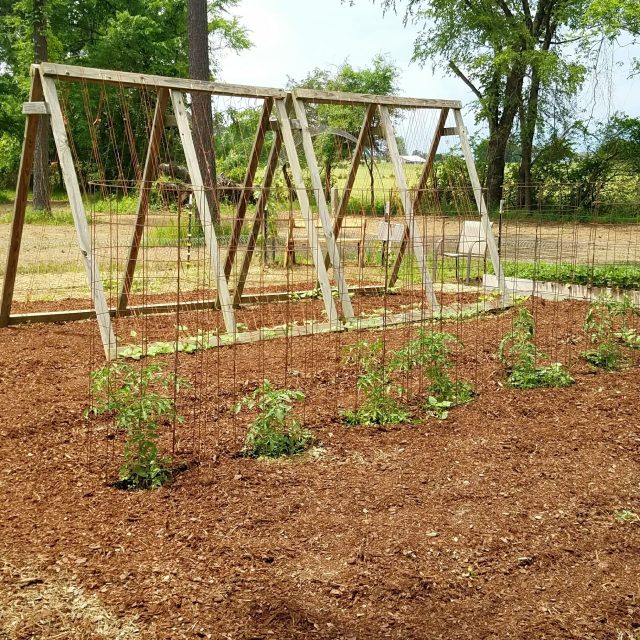
But since I was looking to trellis close to thirty tomato plants, I had to ask, “how do you stake a row of tomatoes?” That’s why I decided to build a bigger trellis using t-posts, PVC couplers, and rebar.

tomato trellis using pvc t-posts and rebar

*links below contain affiliate links

How I Built My Single Stem Tomato Staking System

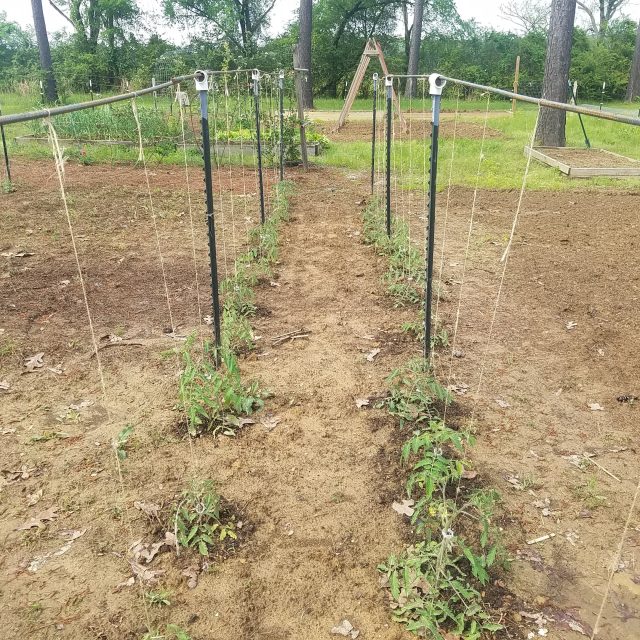
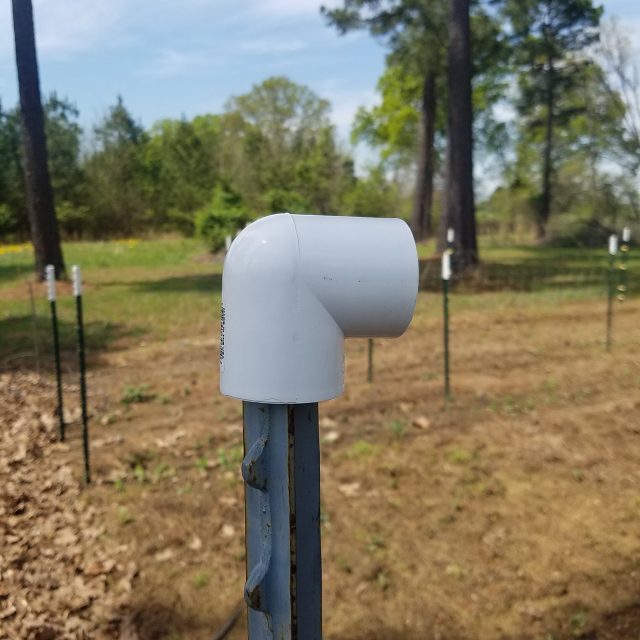
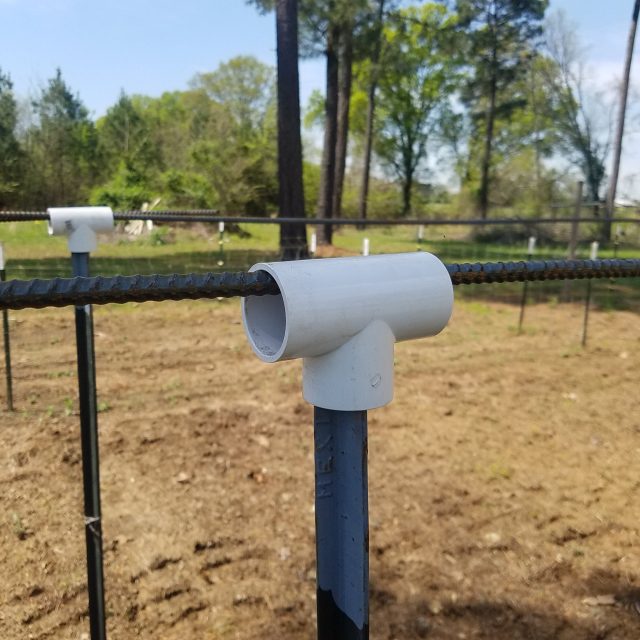
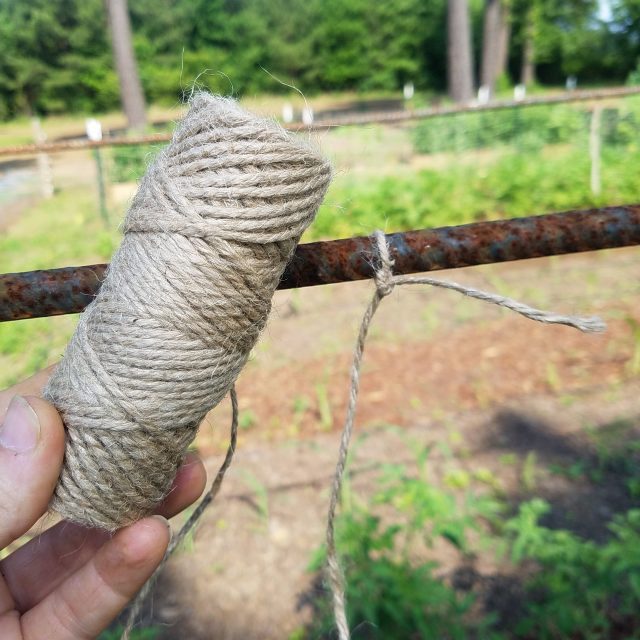
First, I purchased 6′ tall t-posts and set them in the ground about 6′ apart. Then I affixed PVC couplers to the top of the t-posts and set rebar in the couplers for a horizontal trellis.

single stem tomato trellis
pvc tomato trellis
pvc rebar tomato trellis

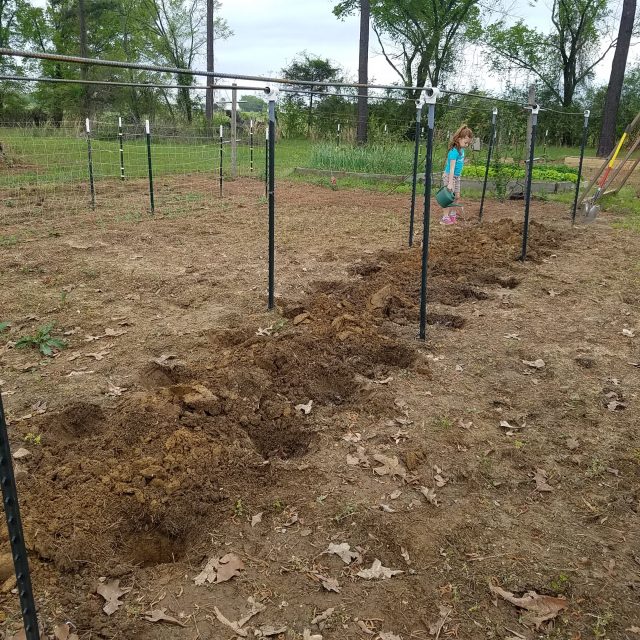
From the rebar, I tied twine and brought it to the ground next to my newly planted tomato transplant. I tied the twine to a landscape pin, which I plunged in the ground next to the tomato stem.

attach twine to rebar
attach twine to landscape pins

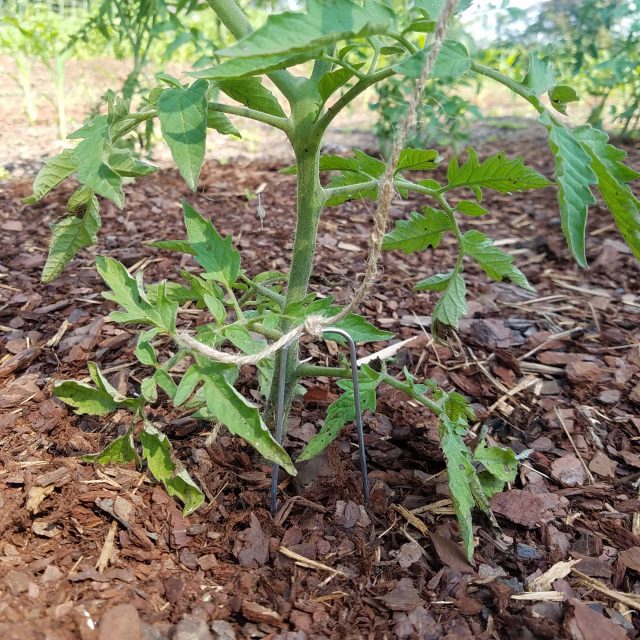
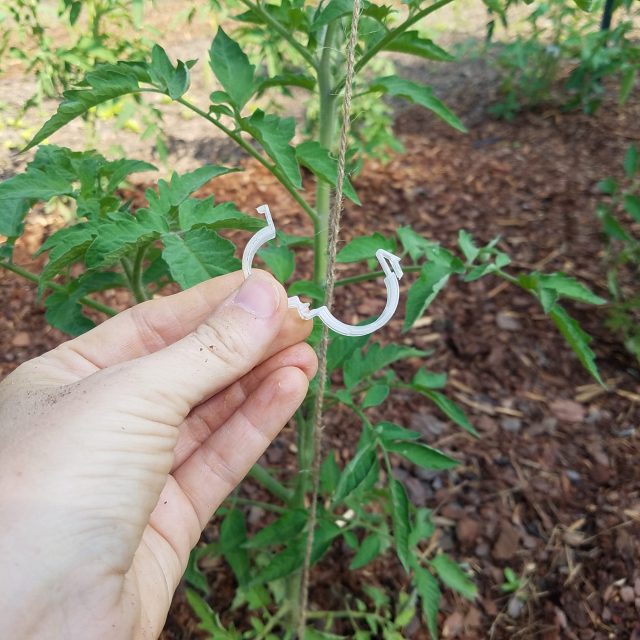
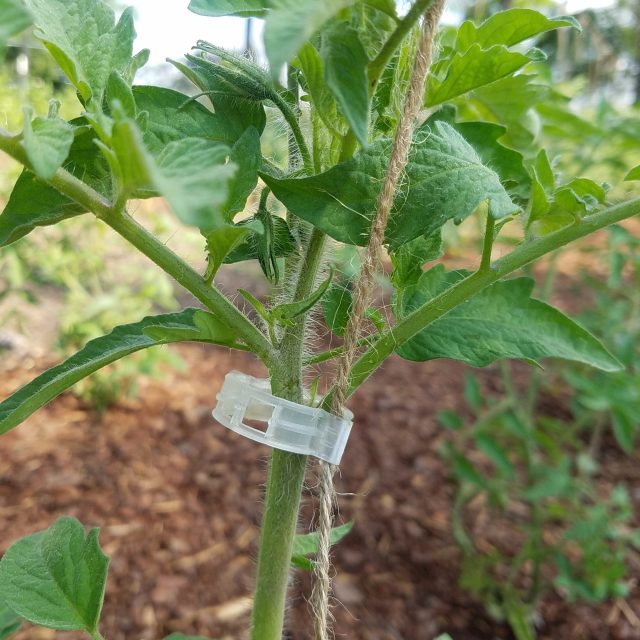
As the plant grew, I used tomato clips to affix the main stem of the tomato plant to the twine at intervals of about 12″.

tomato clips
tomato clip on tomato plant

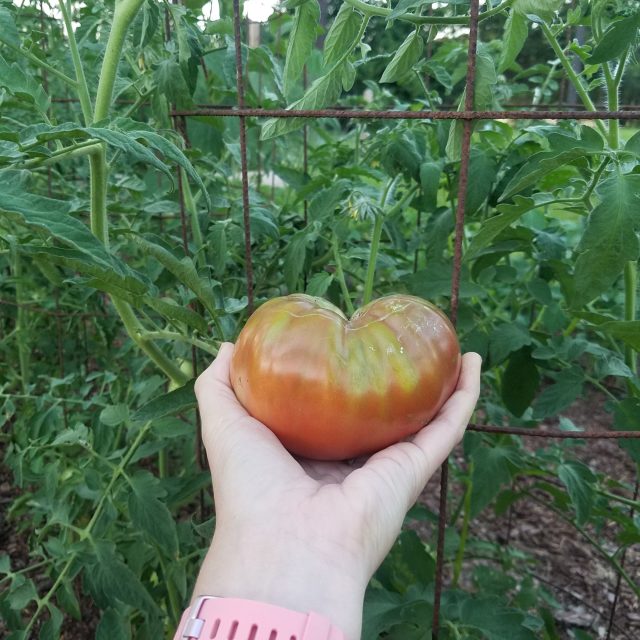
I planted each tomato plant two feet apart, aiming for an intensive planting method to get more plants into a smaller amount of space. In the test I planted Amish Paste, Arkansas Traveler, and Black Krim varieties.

Toward the end of the season, after the vining tomatoes outgrew even the horizontal rebar, I trained the stem horizontally across the rebar.

Heavy Duty Tomato Cage

heavy duty tomato cage

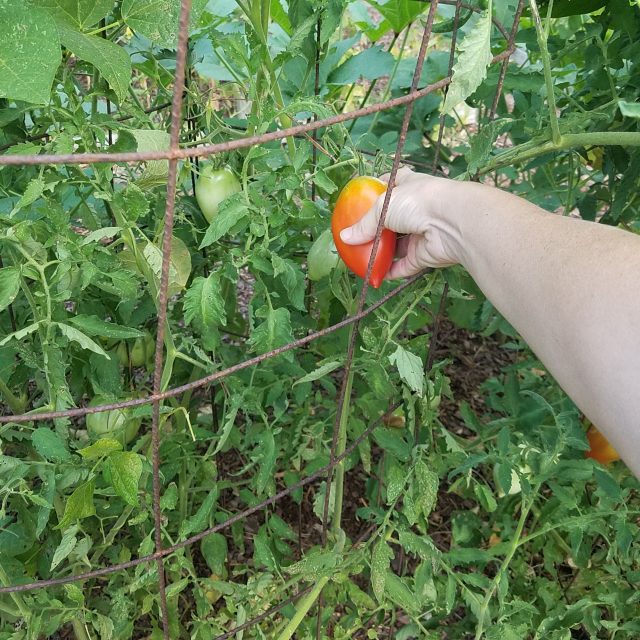
With a heavy duty tomato cage, the goal is for the tomatoes to grow freely while being well supported. The cages should be at least 5′ tall — enough to accommodate most vining tomato varieties. You want to be able to reach your hand into the cage both to harvest and to hand-pick pests. Six inch by six inch square openings are ideal.

tomato harvest

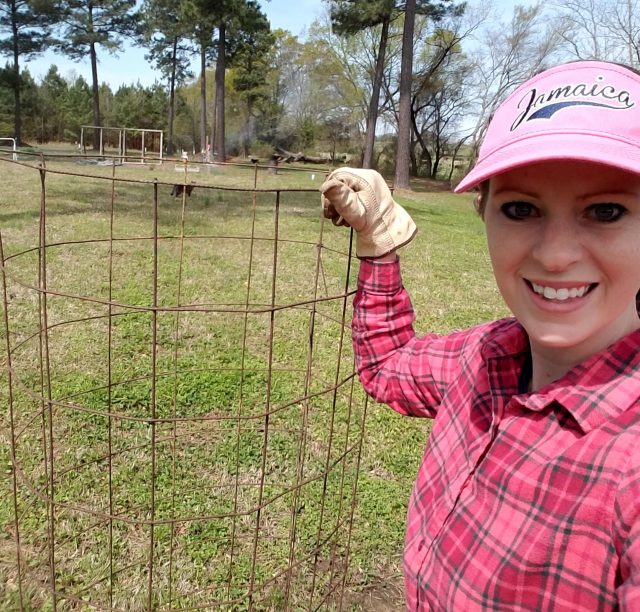
Though you can use concrete mesh, welded wire, or other heavy duty tomato cages, I chose to use concrete mesh.

How I Built Tomatoes Cages Using Concrete Reinforcing Wire

For the heavy duty tomato cages, I used leftover concrete reinforcing wire mesh that we had after we poured a patio.

Using bolt cutters, I cut the mesh into 6′ sheets and rolled them into circles. (I have also seen others make more narrow cages and only cut 5′ sheets.)

tomato cage using concrete reinforcing wire mesh

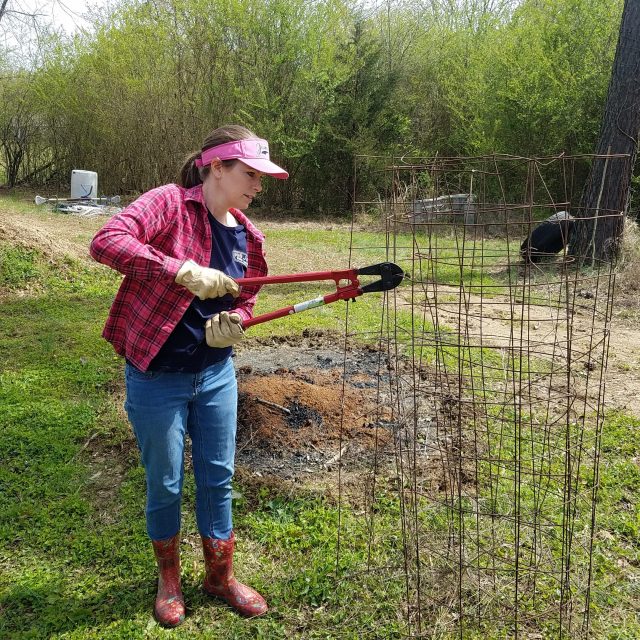
At the bottom of each 5′ tall cage, I cut the bottom layer of horizontal wires so the vertical wires would serve to stick into the ground for stability.

In order to test the cages against the single stem method, I used the same varieties — Amish Paste, Arkansas Traveler, and Black Krim.

Tomato Stakes vs. Tomato Cage: Which Yielded More?

tomato cages vs stakes for a better harvest

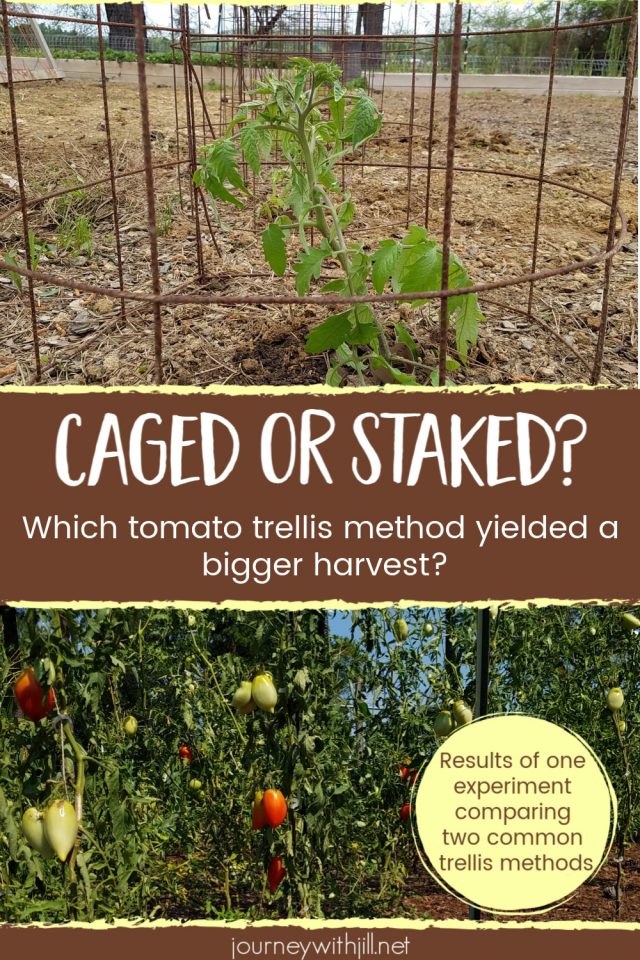
Although I only tested these methods against each other over the course of one season, the results were staggering.

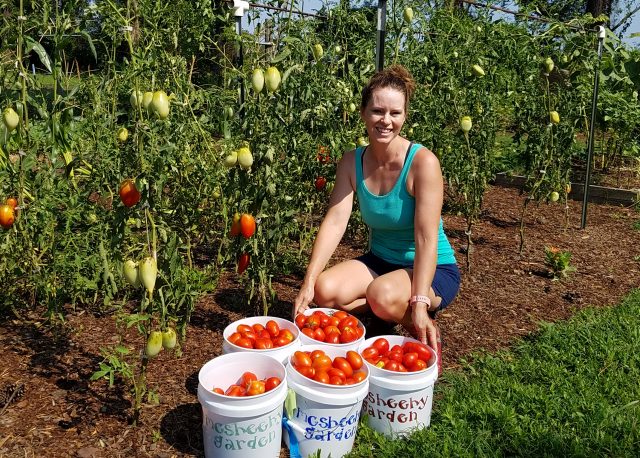
The tomatoes I planted in the heavy duty tomato cages yielded twice the amount of tomatoes in pounds per plant.

Though I tried to make the tests equal in every other way, I need to share some variables that may have contributed to the stark difference in yield.

The tomatoes using the tomato cage were planted further apart. Due to the sheer size of the tomato cage, the tomatoes themselves were spaced three to four feet apart on center. This could have contributed to the heavier yield because they didn’t have to compete with each other for nutrients.

tomato cages in garden

The tomatoes using the tomato cage were planted in a different area of the garden. While both sets were only about twenty feet apart, the garden area where the caged tomatoes grew has not been in production as long as the area where the staked tomatoes grew. It’s possible, therefore, that the caged tomatoes had more access to nutrients in a less depleted soil.

Pros & Cons of the Single Stem Tomato Staking Method

Besides the lower yield in my test, there are other considerations when it comes to using a single stem tomato method.

Using the staked tomatoes, I was able to spot tomato hornworms more easily. This method also allowed more easy picking of the tomatoes themselves. And when pruned to a single stem, rows of tomatoes offer a neat and tidy look to the garden.

tomato harvest

By contrast, my staked tomatoes showed higher vulnerability to sunscald. This probably had more to do with the less amount of foliage available (due to pruning) to shade the fruit from the sun. These plants also succumbed more quickly to Septoria Leaf Spot. Again, I’m attributing this to the lower amount of foliage, thus a quicker demise.

Though you can stake tomatoes using a single stem using any vertical stake, the system I used cost about $60 for two rows of approximately 28 feet. This supported 24 plants at a cost per plant of $2.50. And if I were to continue using this method, it would last for years to come.

Pros & Cons of the Heavy Duty Tomato Cage

Besides the higher yields in my test, I want to make sure to share both other benefits to the heavy duty tomato cage and a few drawbacks.

I loved that my cage ended up doubling as a bean trellis. Since I had grown pole beans the year before in that spot, volunteers grew up the cage, giving me even more harvest and providing aesthetic appeal to the system. I also know that these cages will last for years — some people using this method attest to 10-15 years of use.

I have to admit, picking these tomatoes wasn’t as easy, as I generally had to reach into the tomato cage to harvest. And because the concrete mesh rusts quickly, I had to be careful not to cut myself on the rusty metal. (This wouldn’t be a problem with welded wire.)

And if you find your tomato plants outgrowing the cage, here are some tips on pruning your tomatoes at the end of the season. 

harvesting tomato

Perhaps the biggest drawback to the heavy duty tomato cage is cost. Not everyone has concrete remesh lying around from a construction project like I did. If you were to purchase this concrete reinforcing wire, you would have to pay over around $165 for a roll. Although this roll gives you 150 feet and you could make 25 cages, you might not need that many. Still, at a cost of $8.25 per cage, this is much cheaper than heavy duty cages you can price elsewhere.

Tomato Stakes vs. Cages: Which is Better?

If you can’t tell by now, I choose heavy duty tomato cages hands-down. But, if you have the time and sense of adventure, I urge you to do a similar test in your own garden.

Tomatoes grow differently depending on your climate, and you may find different results. But for me, the ease of cage (once it’s built) and not having to prune the plant makes this an easy decision for me.

Heavy Duty Tomato Cage for the win.

tomato cages for a better harvest

What about you? What results have you found in your garden with different tomato trellis methods?

Related post: Tomato Troubleshooting Tips with Joe Lamp’l

Grow Ingredients for Fresh Salsa!

Do you want to make delicious, homemade salsa from fresh-picked ingredients you grew yourself?

In this guide I will teach you how to grow a salsa garden, from planning to canning, and everything in between.

Enter your e-mail address and I'll send you this 28-page download for free!

Plus, I'll send you my "In the Garden E-mail" on Fridays, periodic updates on garden resources relevant to you, and you'll get access to my entire bank of free garden downloads!

You are also agreeing to our privacy policy.

Success! Now check your email to confirm your subscription, and your guide will be on its way!

There was an error submitting your subscription. Please try again.

Powered by ConvertKit

Other Posts You Might Like:

FacebookTwitterPinterestLinkedInEmail

Filed Under: Garden Planning, Gardening Tips & How-to's, In the Garden, Spring Garden, Summer Garden, The Beginner's Garden Podcast, Tomatoes, Vegetables, Vegetables

Previous Post: « Continuous Harvest vs. Quick Maturing Vegetables
Next Post: Raised Bed Garden FAQs: 9 Common Questions »

Reader Interactions

Comments

  1. Francesca says

    March 20, 2019 at 1:22 pm

    This is a very handy guide and with some lovely photographs too. Thanks for sharing your advice and experience. Those cages definitely look very sturdy!

    Reply
  2. Erin says

    March 21, 2019 at 4:48 pm

    I used nylon trellises (think wall instead of cage) last year. I trimmed my tomatoes in an espalier style. Trying to keep growth inline with the trellis. Helped with air flow and finding fruit! I do plant 1 per square foot (SFG raised beds) but we had more than enough tomatoes. I have a big garden! I took suckers off the first couple months but after a while I let the suckers grow since new growth of main stem had grow above my reach and I started trimming the tops. The drawback of the nylon trellis was it was floppy. I’ve upgraded to the remesh metal panels used for concrete. Like what you made yours from but I got the sheets that were flat so I didn’t have to unroll and flatten out the roll. I’m excited. Tomatoes are planted.

    Reply
  3. Renee says

    March 22, 2019 at 7:30 am

    Jill,

    Thank you for the great analysis of the 2 methods. It was easy to understand and the photos were great.

    Reply
  4. Jan says

    March 25, 2019 at 10:47 am

    For a little more expense, they have spray rubberised paint for yard tools, you can paint cage to prevent rust & add color & not be an eyesore. I guess just painting with a Rust-Oleum would do it too. Liked the comparison & info. This will be my 1st year at gardening & I’m also going to try different methods for comparison. Thanks for tip about differences between handling the different types of tomatoes, ie, vining etc.

    Reply
  5. Becky Porter says

    March 27, 2019 at 9:14 pm

    Great post and podcast Jill! I listened to the podcast today and found your results fascinating. I do the florida weave, like you mentioned, for my determinate tomatoes and really love it. For my indeterminate tomatoes I do a combo of florida weave, staking, and doing a large wood trellis similar to your T post and Rebar but very tall at 7 feet. It’s been working well but I do have to prune some of the suckers off which does lessen yields. I also do the tight spacing at 2 feet. After hearing your results I think I’m going to make some heavy duty cages too!

    Also, I was thinking about it and it seems like the yields per square foot seem the same for both methods right? The four foot spaced tomatoes yielding double what the two foot spaced tomatoes did?

    Either way, if they get less disease being caged I’m all about that haha! Thanks for the inspiration, I like too experiment too and will try it out! I also had a good laugh over your baby tiger comparison to the cages they sell at the store. It’s so true, they look nice but the reality is those cages are a joke for anyone living in the south 🙂

    Reply
    • Jill says

      March 28, 2019 at 9:55 am

      Good point on the square footage. I did some more calculating and the caged tomatoes were closer to 3 feet apart instead of 4, so the caged tomatoes yielded 75% more than the unpruned staked tomatoes per foot row. I will probably stick with the 3′ apart with the cages this year and I’ll re-calculate and see how they compare to last season.

      Reply
      • Becky Porter says

        March 28, 2019 at 1:28 pm

        Ahh that’s good to know! I’m have to be super space conscious because I’m trying to grow so much in a small area. So that helps for sure. I’m definitely going to try your method in with some of the tomatoes and see how it goes!

        Reply
        • Jill says

          March 29, 2019 at 6:10 am

          I’d love to hear if you get similar results or not. Even though you and I garden in similar climates you never know from one garden to another!

          Reply
  6. rovernut says

    May 3, 2019 at 12:11 pm

    My wife and I use the concrete reinforcing mesh. I haven’t really compared it to other methods as this is what my father used starting in the 70’s so it was sort of natural to continue the tradition.
    I do have a good number of the coated larger commercial round tomato cages what work well for my pepper plants, especially jalapenos. Not so much for cayennes though, they get too tall. I’ll be using reinforcing wire for them also this year.

    Reply
    • Jill says

      May 3, 2019 at 3:05 pm

      I didn’t realize cayennes get so tall! I’m growing this year for the first time.

      Reply
  7. Timothy says

    December 21, 2019 at 3:39 pm

    Like the idea of rebar and pvc nice support for tomato cage.

    Reply

Leave a Reply Cancel reply

Your email address will not be published. Required fields are marked *

I accept the Terms and Conditions and the Privacy Policy * for Click to select the duration you give consent until.

This site uses Akismet to reduce spam. Learn how your comment data is processed.

Primary Sidebar

Hi! I'm Jill McSheehy and I'm so glad you stopped by! If you're a beginning gardener needing help getting started or an everyday gardener looking for new ideas, you're in the right place!

You'll find gardening articles, The Beginner's Garden Podcast, and more!

To learn more about me and follow along in my journey, visit "Meet Jill" here, and subscribe above for instant access to all of my free gardening downloads, plus my Friday e-mail full of relevant gardening tips and ideas to help you grow your best garden!

From the Shop

Learn More

Most Popular Posts

  • 7 Common Mistakes in Raised Bed Gardening
  • 3 Raised Bed Soil Mixes Compared
  • Growing Blueberries? Avoid these 4 Beginner Mistakes
  • Is Indoor Seed Starting Right For You?

Categories

Follow Me on Instagram

Notice a difference between the cabbage seedlings Notice a difference between the cabbage seedlings on the left and the ones on the right?
.
.
I just love testing different things in my garden, and for these seedlings I tested two treatments I’ve never tried before: foliage feeding and a “root dip” using the plant growth product, Organic REV.
.
.
The plants on the left were untreated; the ones on the right were treated.
.
.
A few weeks ago I filled a spray bottle with a diluted Organic REV mixture (per their instructions) and I sprayed the young seedlings on the right. They responded well and began to outpace the untreated group slightly — it was small but definitely noticeable.
.
.
Then last Friday I transferred the seedlings into these larger pots, but before I did it, for the plants on the right, I dipped the root ball in a 50/50 REV/water mixture, saturating the soil and roots before transplanting. Again, the plants on the right were the only ones that got this root dip.
.
.
The soil all plants are growing in is the same: a potting mix plus some Plant Tone organic fertilizer.
.
.
It was after this root dip and transplant that the seedlings on the right started pacing much more ahead of the ones in the untreated group.
.
.
While all the seedlings (treated and untreated) are growing in this fertile soil medium, what Organic REV is supposed to do is appearing to prove true — at least in this test. It helps plants more efficiently take up and use the nutrients that are present in the soil.
.
.
.
.
Organic REV is now a brand partner of the Beginner’s Garden. They sent me their product to try first, and I’m continuing to test it in different ways.
.
.
But what I’m sharing with you is my own experience and results. If you’re interested in their product, look them up here: @buyorganicrev Use my affiliate code JILL10 to get 10% off if you want to try it for yourself.
.
.
.
.
#organicrev #foliarfeed #foliarfeeding #indoorseedstarting #indoorseedlings #pottingup #cabbage #cabbageseedlings #organicgardening #organicfertilizers
I don’t know if I’ll ever get used to harvesti I don’t know if I’ll ever get used to harvesting from my garden in the winter. It snowed today, even! (Okay, just a dusting, and it already melted, but in central Arkansas, any snow is worth celebrating! 😂)
.
.
Although I’ve grown cabbage in the spring before, this is my first time harvesting a fall crop. (My last two attempts were thwarted by hungry rabbits or rogue hens 😡.)
.
.
I have several more plants that I’m hoping to harvest from now that the days are getting longer and maybe the heads will start growing again. And I also have a new crop started in my grow room.
.
.
Four-season gardening may sound daunting but I assure you, fall and winter gardening is almost a hands-off endeavor. The only thing it really takes is a little planning (and some nurturing in the beginning).
.
.
And the reward of picking from your garden in the winter (when your climate allows) can’t be overstated. It’s fabulous!!
.
.
If you’re interested in learning how to incorporate more seasons in your garden growing, I have several exciting new resources coming up, starting with tomorrow’s first podcast of the new year on deciding if indoor seed starting is right for you!
.
.
As much as I’m enjoying this winter harvest, I’ve already got one eye in spring! You, too? 😊
.
.
.
#cabbage #growingcabbage #wintergarden #winterharvest #zone7b #arkansasgarden #zone7gardening #gardenplanning
This fall-planted parsley 🌱 has done really wel This fall-planted parsley 🌱 has done really well in my Greenstalk Vertical planter. I recently harvested the lower leaves and dried them for use in the kitchen. But the rest of the plant is still growing well, and I expect to harvest from it for months to come.
.
.
I planted the parsley along with other plants in the Greenstalk planter in September. Although the lettuce is done and I harvested the celery, the herbs like parsley, cilantro, chives, and oregano are going strong!
.
.
I LOVE that I don’t have to buy almost all herbs from the store, even in the winter.
.
.
.
.
#herbs #parsley #herbgardening #greenstalkplanter #greenstalkverticalplanter #containergarden #containergardening #containerherbgardening #wintergarden #winterharvest #winterherbs #zone7b #zone7gardening
I’ve spent the better part of two days selecting I’ve spent the better part of two days selecting and ordering seeds for this year. My husband thinks my intensive research is a bit over the top. Maybe.... 🤔
.
.
But here’s what I do:
.
1️⃣ Select the seed companies I’ll purchase from. Most of my orders were from @southernexposureseed because I’m in the SE US and the varieties there fit my climate well. Next, I placed a large order from @territorialseedcompany (great selection, informative catalog, and some of the best prices). From there, I supplemented with seeds from @bakercreekseeds (high quality heirloom seeds, highly dependable, free shipping), @johnnys_seeds (unique varieties for different needs than I can get elsewhere), and @seed_savers_exchange (heirloom seeds with a great mission).
.
.
2️⃣ I went through my top 3 catalogs, circling varieties I was interested in.
.
.
3️⃣ I entered each variety in my Seed & Plant Research sheet from my Complete Garden Planner, noting unique characteristics, days to maturity, and price. (Not all seed packets are equal in quantity so it pays to be a savvy shopper.)
.
.
4️⃣ I chose which seeds to purchase.
.
.
I usually plan my entire garden before ordering seeds, but I was a bit nervous about the seed supply (thankfully only a few varieties were sold out), so I did my best in choosing what I’d need.
.
.
The process was LONG but a great way to spend the last two days of 2020 — with HOPE for the 2021 garden season! 💕
.
.
Have you ordered seeds yet? Where do you like to order from?
.
.
(My printable Complete Garden Planner is available in my shop, link in profile.)
.
.
#seedshopping #orderingseeds #gardenseeds #garden2021
#gardenplanning #gardenplans #seedcatalog #seedcatalogs #wheretobuyseeds #gardening #gardeningtips #gardentips
My greenhouse lettuce is coming along! 🥬 I expe My greenhouse lettuce is coming along! 🥬 I expect now that the day length ☀️ will be increasing, the growth will accelerate in the next couple of months.
.
.
I think I planted these in early October, so you can see how slow they grow this time of year, even in the warmth of the greenhouse. But it’s so nice to see signs of growth and hope for future lettuce harvests! 🥬
.
.
I’m almost to the end of my main fall lettuce, so I’ll be glad when these are ready to eat!
.
.
#lettuce #greenhouse #greenhousegardening #wintergarden #wintergardening #greenhouselettuce #falllettuce #growbag #growbags #greenhousegardener #containergardening #containergarden #containerlettuce
Would love to hear your personal experience using Would love to hear your personal experience using shredded leaves as mulch! 🍂
.
.
🌲 The trees on my property are mainly pine trees, so I’ve never had fallen leaves to collect and use as mulch. (That’s mainly why I use wood chips.) But when my dad offered to collect and bag up his leaves and give them to me, of course I said yes!
.
.
Twenty-five bags later I realized I needed to figure out how to best use them. I knew they’d blow away if I just dumped them on the garden and they’d take forever to break down if I threw them in the compost pile. So I watched a few YouTube videos and settled on a leaf shredder.
.
.
(A lot of people use lawn mowers to mulch their leaves but we don’t have a mower like that. I also tried the weed-eater as an immersion blender in a trash can idea once and it was a disaster.)
.
.
I LOVED this leaf shredder! It was really easy to use and I shredded 25 bags in just a couple of hours. Most people shred the leaves into bags but I created a simple wired bin to collect mine, and I shredded the leaves directly into it. I applied the leaves to several beds already but I have half of them still in the bin to use later.
.
.
How do you use fall leaves in your garden? I’m excited to try this method that I have enviously watched so many gardeners use over the years!
.
.
.
#leafshredder #leafmulch #leafmulching #leafmulcher #fallenleaves #autumnleaves #mulch #gardentips #fallgardening #gardenchores #compost #leavesasmulch #fallgardencleanup @worxtools
Follow on Instagram

Join Me on Facebook

Join Me on Facebook

Footer

Disclosure:

Some links on this site are affiliate links, which means I may receive a small commission if you purchase products I recommend. This does not cost you any more but does help me offset some of the costs associated with this blog. I only promote items I personally recommend and think provide benefit to my readers. Journey with Jill is a participant in the Amazon Services LLC Associates Program, an affiliate advertising program designed to provide a means for us to earn fees by linking to Amazon.com and affiliated sites.

Read my Privacy Policy, Disclaimer, and Terms of Use.

Stay Connected

  • Facebook
  • Instagram
  • Pinterest
  • Twitter
  • YouTube

Copyright © 2021 Jill McSheehy | Design by The Design Diva | Development by MRM