
Garden Soil Testing: A Beginner’s Guide
Updated September 2020
If you’re starting your own garden, maybe for the first time, soil testing probably isn’t the first thing that you think of doing. You’re more concerned with choosing your plants or building your raised beds.
Most gardeners, I’d venture to speculate, do not begin to consider testing their soil until a few seasons later. Perhaps you can relate. You may have noticed a lack of growth or unidentified problems in the plants or fruit. Or your tomato plants looked stunning but haven’t produced a single tomato. Or you’re at your wit’s end because your beautiful fruit continues to develop blossom-end rot.
It’s at this point you become curious about our soil and what’s going on underneath that layer of mulch. You’ve heard about soil testing but it’s overwhelming for you, and you don’t know where to begin.
Having tested my soil each year since before I planted my first garden, I’ve become a huge proponent of soil testing. It not only gives you a snapshot of your garden’s health but it helps you correct current problems and avoid future ones.
In this episode of the Beginner’s Garden Podcast, I give you the basics of soil testing. Click below to listen or continue reading the blog post below.

*links in this post may contain affiliate links.
Why Test Your Garden Soil
If your child starts feeling ill and you take him to his doctor, what does the doctor do? He or she examines the child’s ears, throat, nose, and breathing, and a test of some kind might be ordered. The doctor doesn’t jump straight to a prescription without identifying the problem, right?
The same is true for our garden soil. Many gardeners start noticing problems in their plants and jump to a remedy they think will help, but in some cases that remedy actually makes the problem worse. Before blindly addressing a plant issue, it’s critical to understand the environment in which your plants are living.
The Importance of pH in the Garden
Most vegetables and fruit thrive when the pH of the soil hovers in the 6.0 to 7.0 range. (There are exceptions, like blueberries.) If your soil’s pH levels sit too far outside that range, it won’t matter how many nutrients your soil possesses because the plants cannot access them.
Picture yourself trying to drink a really thick milkshake through a straw. The delicious milkshake is in the cup, ready for you to enjoy, but its thickness prevents you from drinking it. That’s what happens when a garden soil’s pH is out of the ideal range. But if you don’t know your soil’s pH, you don’t realize your garden doesn’t need more fertilizer. It needs something else to get the pH in balance.
My first soil test showed a soil full of nutrients but the pH was a very low 4.9. (This probably explained why my blueberries performed so well while my vegetable garden struggled.) Because of this information, I took steps to add lime to the soil, which raised the pH to a healthy level.
Address Nutrient Deficiencies in the Soil
In some gardens, the pH sits in the ideal range, but certain nutrients are absent. This can happen for a number of reasons. Perhaps your soil contains more sand content and nutrients leach out with heavy rains. Or perhaps multiple years of gardens have depleted the nutrients.
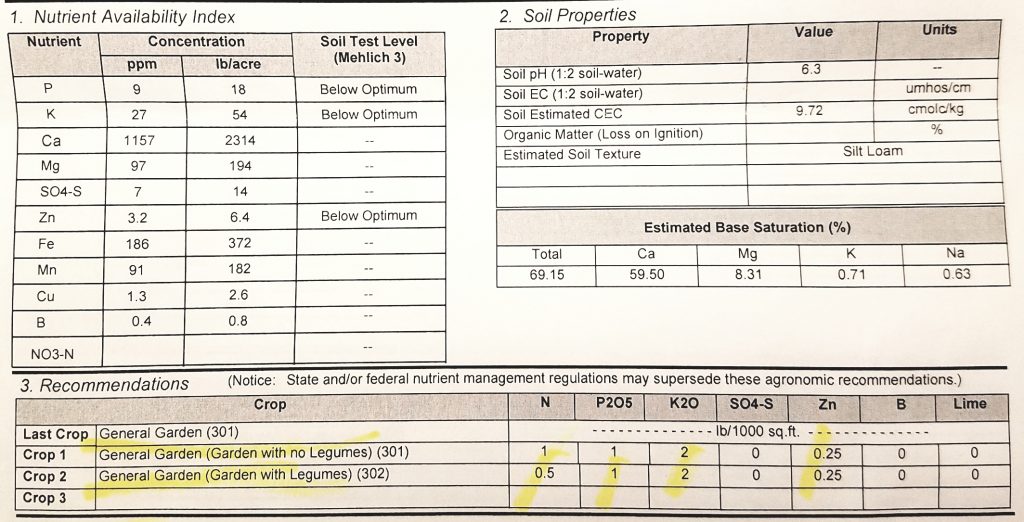
That’s what happened to my soil over time. The lime I added to my soil raised the pH to a healthy 6.3 within a couple of seasons, yet the levels of two critical nutrients — phosphorus and potassium — dropped after years of gardening in the same soil.
Avoid Harm by Not Adding Unnecessary Nutrients
A soil test tells you which nutrients you soil is lacking so you can take steps to add those nutrients back in. But it also tells you which nutrients you do not need to add.
From one soil test, not only did I find out I need to add phosphorus and potassium, but I also learned my soil contains ideal levels of calcium and magnesium. Yet it seems I’m constantly reading blogs that suggest eggshells and Epsom salts as the cure-all for plant issues. While the effectiveness of these amendments remains a subject of debate, I know because of my soil test I do not need to add these elements. In fact, too much of these minerals can create their own problems.
When to Test Your Garden Soil
The ideal time to test your garden soil is in the fall so you can have time to amend the soil as necessary — especially in the case of needing to adjust the pH. I find it easiest to take the samples of my soil after the garden has finished and before I begin the next season.
The fall also gives you time to amend the soil and prepare it for the next season. If your pH is too high or low, it will take a few months at least or lime or sulfur to make a difference. Organic amendments also take time to become available to plants.
How to Test Your Garden Soil
Taking soil samples from your garden isn’t as hard as you might think. These are the basic steps:
- If your garden site is already established, rake aside any mulch. If it is a new site, strip the top layer of grass or weeds.
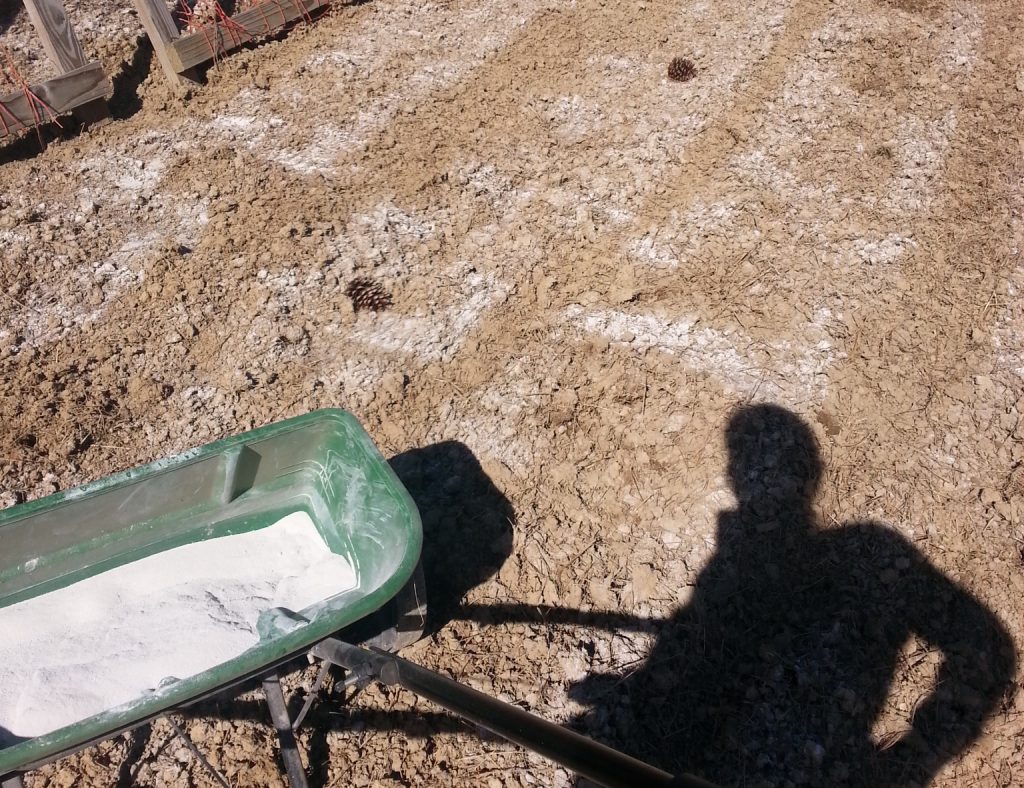
- Use a shovel or trowel and dig down four inches. Take a sample from top to bottom and place in a bucket.
- Do this in several different locations in your garden for a representative sample.
- Mix all the samples together in a bucket, removing debris such as rocks or roots, and crush clumps of dirt with your fingers.
- Let the soil air dry for a few days. (I rarely do this, unless the soil is saturated.)
- Fill a gallon-size plastic zip-top bag about halfway (or measure out how much of a sample your soil testing lab requires).
- Take the sample to your local extension service or mail it to a soil testing laboratory for testing.
Soil Testing with Your Local Cooperative Extension Service
My state’s extension service tests our soil for free, which is one reason I’ve tested my soil each year. If you do not live in Arkansas, consult with your local extension service for instructions and fees.
While fairly convenient, my main issue with my local extension service’s test results is the lack of organic recommendations. As an organic gardener, I don’t use synthetic fertilizers. I appreciated the soil test results but I was on my own when it came to how to amend my soil in an organic way.
Soil Testing with an Independent Lab
Thankfully, there are other options for soil testing, particularly if you want organic recommendations.
One option is an independent company like Another option is to purchase a home soil testing kit. Below I compare two home testing kits with the results from my cooperative extension service, and you can view the results here: Personally, the home soil testing kit option was my least favorite. I didn’t trust the results of the meter, and the soil test kit was a bit cumbersome to perform. I have to confess. While I have a bachelor’s degree, I never once took a chemistry class. Not in high school or college. So when I received my first soil test results, I thought I was reading a foreign language. Every year, with every soil test, I research and learn more and more (including learning what each section tells me), but I’m far from an expert. But I will tell you what I do and how I’ve made my soil test work for me. The first value on your soil test you need to examine is the pH. As mentioned above, if it’s too high or too low, you will need to take steps to amend the soil. At the bottom of my soil test, the extension office gives instructions on what to add to the soil, and while the nutrient addition suggestions I ignore because they aren’t organic, the suggestions for pH adjustment I follow to the letter. Application rates for lime and sulfur will depend on the composition of your soil. All of these factors are considered when you see the suggestions for amendments. Understand, though, these are recommendations for most garden plants. If you want to grow blueberries, for instance, you need a pH of 4.0 – 5.5. Potatoes also thrive in a slightly more acidic soil than other garden plants. And asparagus prefers a slightly alkaline soil (6.5-7.5). Before you amend, know what you will be growing in your garden. In my garden, I grow blueberries in an entirely different area that never receives lime or wood ashes (which raise pH), and I grow asparagus in a raised bed where I add more wood ashes at a higher rate than the rest of the garden. But the rest of the plants thrive in the garden with a pH in the low 6 range. Macronutrients are the “big 3” — Nitrogen, Phosphorus, and Potassium. Micronutrients are the elements your garden plants need but in smaller amounts. Unfortunately, nitrogen is a difficult nutrient to measure in a soil test. My extension service doesn’t measure it at all in the fall. That doesn’t bother me, though, because I know my garden needs nitrogen and I can measure it well enough by watching the leafy growth of my plants. (Too much leafy growth and no fruit might indicate too much nitrogen.) But if you discover a deficiency in another macronutrient, take steps to amend the soil with sources high in those elements. As an organic gardener, you may have to do some research, as most of the recommendations coming from extension services are not organic. This blog post about organic fertilizers is a great place to start. In my experience, a deficiency of micronutrients is less of a problem in organic gardens amended with compost. Your local county extension agent is most likely more than willing to help you understand your soil test and offer recommendations. Just be sure to communicate your desire to stay with organic practices. Every time I receive the envelope in the mail with my soil test, I feel like I’m opening the results of my ACT test or a college acceptance letter. It’s so exciting! Plus, I love being able to compare my garden from year to year. After you make changes to your garden based on your soil test results, test again at the same time next year and evaluate the differences. Chances are, over time you will learn what your garden needs and how to increase its fertility year after year. – Have you tested your soil? If so, what surprised you about the results? If you haven’t tested your soil yet, what results are you hoping to find? Leave a comment below! Enter your e-mail address below, and immediately access ALL my free downloads, such as: Monthly Garden Task Organizer Plus, you'll receive my Friday garden email You are also agreeing to our privacy policy.Home Soil Testing Kits
What To Do With Your Soil Test
Take Steps to Change the pH
Address Nutrient Deficiencies
Consult with an Expert
Adjust and Test Again
Are you a beginning gardener?

Vegetable & Fruit Planning Pages
Frugal Garden Guide
Blueberry Planting Workbook
Salsa Garden Guide
A-Frame Trellis building plans
Seed Starting Quick Reference Guide
Garden Fresh Recipes cookbook
and more!
with a peek in my garden plus tips to help you grow your own!
HELP! I just got my soil analysis (I know after reading your article that I should have done it last Fall) and it is a mess. My soil ph is 7.5! No wonder nothing grew the last 2 seasons. Abnormal results are Pot is 118, Calcium 2718, sulfur 11, Boron 0.7, and iron is off the chart at 324.
The lab recommended sulfer not to exceed 5lbs per 1,000 sq. ft. How do I know how much to add for my tiny 15×15 ft. garden? How do I lower the calcium, potassium and most of all my sky high iron?
Do you think I should abandon plantings this year until my soil is in better shape?
Thanks for any advise.
Kerry
I’m not an expert in this area, so I’d recommend contacting your local county cooperative extension service before doing anything. As far as the sulfur rates go, if my calculations are correct, you’ll need about 1 pound for your garden space. When pH is too low or too high, nutrients can’t be utilized by the plants effectively, so I’d guess that if you can get your pH in a lower range, the plants can start using the excess of nutrients and this, along with application of organic matter, should help level out those levels over time. Personally, I wouldn’t abandon the planting, but I would look at different vegetables and their pH tolerances. Potatoes, for example, prefer slightly acidic soil, so I wouldn’t plant them. But other plants can tolerate slightly alkaline soil, so I’d go with those. You may need to research which plants you want to grow and plan accordingly for this year. It might be too late to plant this, depending on where you live, but broccoli is a heavy feeder of calcium so you could try a fall planting of broccoli, for example.
It’s great to learn that garden soil should be tested during the fall season. My wife and I are wanting to make our garden look better and we were wondering when we should have our soil tested. I’ll be sure to tell her that we should get the garden soil tested in the fall.
Beautiful read! Just wanna ask you in what ways can soil testing enhance the success of a beginner’s gardening journey?
Thank you. I just planted 2 blueberry plants in pots on my patio in Florida. One I rescued and has berries on it. Northern highland and one is a new one from bush and barrel pink icing. I used coast of Maine acid loving plants soil and mixed in Jobes soil acidifier. Had high alkaline and not recommended ph is about 6. Do I wait to adjust since they were just planted or do something now. If so, what? Add more soil acidifier to the top? Would appreciate the guidance.
I think a call to your cooperative extension service would be in your best interest. They are much more familiar with the chemistry of amending soil. I would say to go ahead and add sulfur, as it does take time to take effect. But since the plants are new and young, and in a container, I’m not entirely sure if there would be a risk in that. I’d hate to unequivocally tell you what to do and not know for sure.