• Home
  • In the Garden
  • Life & Faith
  • Nav Social Menu

    • Facebook
    • Instagram
    • Pinterest
    • Twitter
    • YouTube

The Beginner's Garden

Helping Beginners Grow a Rewarding, Successful Garden

  • Home
  • Meet Jill
  • Blog
  • The Beginner’s Garden Podcast
  • Speaking
  • Shop
  • Contact

5 Causes of Yellow Tomato Leaves

in In the Garden· Summer Garden· The Beginner's Garden Podcast· Tomatoes· Troubleshooting· Vegetables· Vegetables

FacebookTwitterPinterestLinkedInEmail

Are your tomato leaves turning yellow?

Whether you have cared for your tomato plant from seed or you’ve hand-picked the right transplant from the garden center, a bit of panic may set in when you spot the leaves of your tomato plants turning from green to yellow.

Especially as beginners, it’s hard to know what is normal and what isn’t. And if we find more and more leaves turning yellow, we rightly become alarmed. Still, sometimes it’s difficult to identify the problem and even harder to know what to do about it.

While yellow leaves on tomato plants can be caused by a dozen or more culprits, I’ve found these five among the most common. In this episode of the Beginner’s Garden Podcast, I discuss these five possible causes of yellow tomato leaves, along with identifying markers, prevention measures, and what to do about each of them. Click to listen to the episode or read the post below for the highlights.

5 causes of yellow tomato leaves

Transplant Shock Can Cause Leaves to Turn Yellow

When you first transplant your tomatoes into the ground, especially in the early spring when nights aren’t warm yet, tomatoes will go through a transplant adjustment period. In this week or two following transplant, you’ll notice your once-vibrant green leaves lightening in color. But, if you look at the newer leaves at the top, they are young, healthy, and growing.

What to do about it: Yellow lower leaves should be snipped off anyway (see below), so as long as you see healthy, vibrant leaves at the top of the plant, cut off the yellow leaves at the stem. They won’t benefit the plant and will likely only serve as a gateway for disease.

Transplant Shock Prevention: Some varieties of tomatoes are more susceptible than others, but waiting to plant the tomato plants until the optimum time will help to prevent transplant shock. Wait until the nighttime temperatures stay in the 50s.

Related: When to Plant What: Guide to Getting Your Crops in the Ground at the Right Time:

Early Blight: Most Common Cause of Yellow Tomato Leaves

Early blight is the culprit every year in my garden, and it’s easy to spot when you know what you’re looking for. Caused by a soil-borne fungus, early blight travels from the soil to the lower leaves. At the earliest stage of infection, these lower, older leaves will begin showing irregularly shaped yellow splotches that progress into brown spots with a yellow “halo” around them. The splotches appear almost like a target with a brown center.

early blight tomato yellow spots on leaves

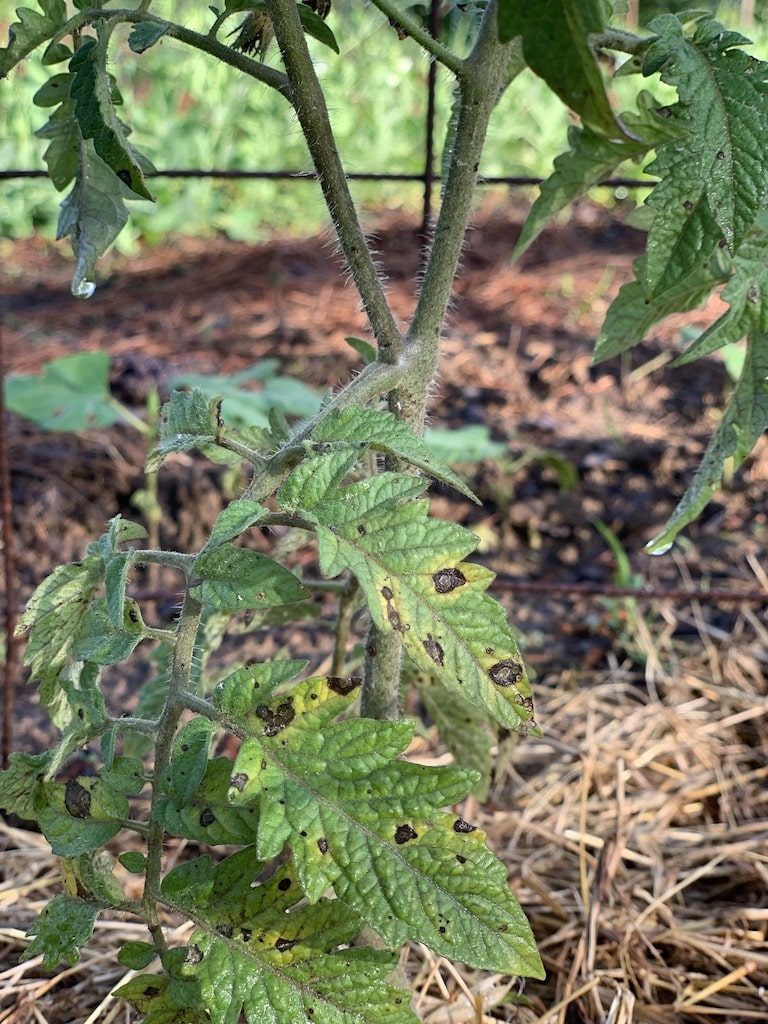
As the disease progresses unchecked, these entire stem and leaves turn yellow and then brown, and finally, they shrivel up completely.

What to do about it: At the earliest sign, cut off the affected leaves. The longer the leaves remain on the plant, the more likely the fungus will spread up the plant to the healthy leaves.

Early Blight Prevention: 

Keep plants spaced out well (3 feet minimum) to allow airflow between the plants. Wet, humid conditions exacerbate early blight.

Mulch heavily in the entire tomato area, creating a barrier between the soil and the tomato leaves.

As the young plants grow, cut off lower leaves completely, especially if they are touching the ground (even if they’re healthy). Leave a 12-18″ gap between the ground and the lowest sets of leaves.

When irrigating, chose a drip or soaker hose method to dispense water to the root zones of the plants (view my choices here). Aim not to let the leaves get wet, which will allow the disease to spread more easily. If you must use overhead watering, do so at the beginning of the day so the water can evaporate quickly. At the end of the season, remove all plants and destroy them; do not compost. Rotate crops next season.

amzn_assoc_placement = “adunit0”; amzn_assoc_tracking_id = “journeywit013-20”; amzn_assoc_ad_mode = “manual”; amzn_assoc_ad_type = “smart”; amzn_assoc_marketplace = “amazon”; amzn_assoc_region = “US”; amzn_assoc_linkid = “86b9570c1fbce5745f1bf0be9fae6269”; amzn_assoc_asins = “B000LO4FFG,B00FGQ1T26”; amzn_assoc_design = “in_content”; amzn_assoc_title = “My Irrigation Recommendations”;//z-na.amazon-adsystem.com/widgets/onejs?MarketPlace=US

(Note: proper irrigation will not only help prevent the spread of disease, but it will also prevent blossom end rot. Read more in this post: Troubleshooting Tomato Plant Problems.)

Read more about early blight on this post: Yellow Leaves at the Bottom of Your Tomato Plants?

https://forms.convertkit.com/147664?v=7

Septoria Leaf Spot

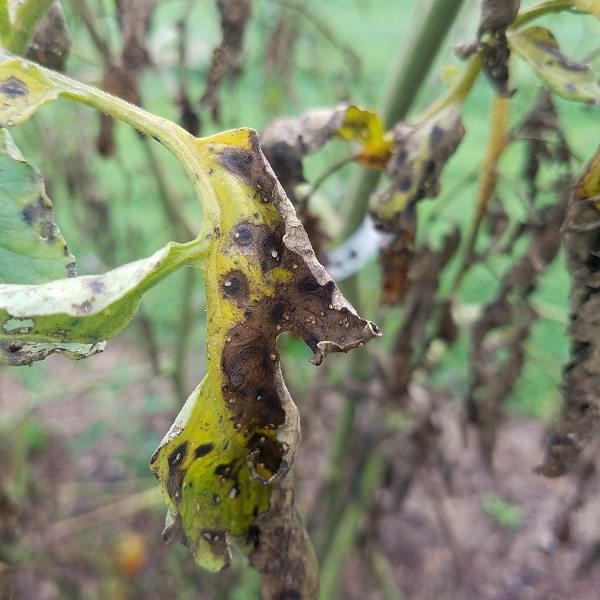
Another fungal disease, septoria leaf spot mimics early blight in many ways. Like early blight, spots on the lower, older leaves begin yellow but then darken into brown and then to tan or gray. These spots are smaller and more numerous than those in early blight, and they take more of a circular appearance. As the disease progresses and the spots grow, they will coalesce to larger brown area. Water-soaked lesions may also appear, sometimes on the underside of the leaf. Tiny black, pimple-like spots in the center can form a secondary infection, infecting the rest of the plant. Left unchecked, the leaves turn yellow, brown, and then die.

Septoria Leaf Spot causes yellow tomato leaves

What to do about it: Use same measures as you would for early blight.

Septoria Leaf Spot Prevention: Use the same prevention measures as you would for early blight.

Verticillium Wilt

With verticillium wilt, leaves will exhibit yellow and brown areas from the middle vein of a leaf to the edge, often in a V-shape. Plants wilt in the hot part of the day. Verticillium wilt is slow to progress and more uniform throughout the plant, but unfortunately, there is no cure and it will eventually overtake the plant. If you suspect verticillium wilt, scrape the stem at ground level, and if you see brown in the normally white vascular tissue, the infection has taken hold. Remove and destroy the plant, rotate tomatoes into a different area next year, and use seed labeled with a resistance to verticillium wilt, since the fungus can remain in the soil for many seasons.

Fusarium Wilt

Fusarium wilt normally doesn’t begin appearing until the fruit begins to mature on the plant. Lower leaves turn yellow, and sometimes this is limited to one stem or shoot, which is bright yellow and wilting. Initially the wilting will show recovery at night. The plant’s growth becomes stunted, but it’s possible if the progression is limited to one stem, some of the crop may reach maturity before the plant succumbs. If you suspect fusarium wilt, scraping the stem will reveal brown vascular tissue, and like with verticillium wilt, there is no cure. You’ll need to follow the same measures and destroy the plant, practice crop rotation, and grow resistant varieties in the future.

As I always recommend when encountering a problem with any plant, utilize your local cooperative extension service if you are in the US. The agents are always willing to help you identify problems in your garden. You can locate your closest extension service here. 

Have you had any experience with any of these tomato plant conditions? 

Further resources:

Verticillium Wilt — Ontario Crop IPM
Septoria Leaf Spot — University of Minnesota Extension
Septoria Leaf Spot — Dr. Sharon M. Douglas, The Connecticut Agricultural Experiment Station
Early Blight and Septoria Leaf Spot — University of Illinois Extension
Tomato Disorders: Early Blight and Septoria Leaf Spot, Karen Delahaut and Walt Stevenson, University of Wisconsin Extension
Early Blight and Septoria Leaf Spot — Cornell University Extension
Fusarium Wilt — University of Maryland Extension
Fusarium Wilt — Missouri Botanical Garden
Bacterial Wilt — Clemson Regulatory Services

Grow Ingredients for Fresh Salsa!

Do you want to make delicious, homemade salsa from fresh-picked ingredients you grew yourself?

In this guide I will teach you how to grow a salsa garden, from planning to canning, and everything in between.

Enter your e-mail address and I'll send you this 28-page download for free!

Plus, I'll send you my "In the Garden E-mail" on Fridays, periodic updates on garden resources relevant to you, and you'll get access to my entire bank of free garden downloads!

You are also agreeing to our privacy policy.

Success! Now check your email to confirm your subscription, and your guide will be on its way!

There was an error submitting your subscription. Please try again.

Powered by ConvertKit

Other Posts You Might Like:

FacebookTwitterPinterestLinkedInEmail

Filed Under: In the Garden, Summer Garden, The Beginner's Garden Podcast, Tomatoes, Troubleshooting, Vegetables, Vegetables Tagged With: growing tomatoes

Previous Post: « Organic Gardening in the Southern Garden: Interview with Misti Little of the Garden Path Podcast
Next Post: Ideas to Get Kids Involved in the Garden — from Toddlers to Teenagers »

Reader Interactions

Comments

  1. Susan Pascal Beran says

    July 13, 2020 at 12:35 am

    I have two planters with both green beans and cherry tomatoes in it. Curiously, in one, both the beans and the tomatoes have some of their leaves turning pale yellow, including the stem and dropping off and dying. It doesn’t seem to be affecting the entire plant, at least not yet. The other planter doesn’t seem to show the same symptoms, at least not to the same degree. I am inclined to think that there is something wrong with the soil in the affected one, although initially the beans grew very vigorously, producing a plethora of green leaves, while the unaffected one flowered, gave beans sooner, but the plants were less robust. I did have an small invasion of cucumber beetle who attacked the beans in both, as well as black aphids on two swiss chard plants in the affected planter. I applied nematodes to both planters, but am wondering if the cucumber beetles had grubs go into the soil before they could have effect. Also, I had miner’s beetle on my swiss chard. Gosh, the plants must be delicious to be so attacked but I want to try to keep them alive- help!

    Reply
    • Jill says

      July 13, 2020 at 11:49 am

      You’ve got a lot of possibilities here, so it’s hard to say what the cause is. My first thought is that if you grew bush beans, once they’ve finished producing beans, they are done with their life cycle, so they might just be dying off naturally. But if both your tomatoes and beans are showing yellow leaves, my guess is a nitrogen deficiency. If they’re in containers, nutrients leach out quickly. A biweekly application of fish emulsion should help if that’s the problem.

      Reply
  2. Ritesh says

    August 31, 2020 at 1:35 am

    All good

    Reply

Leave a Reply Cancel reply

Your email address will not be published. Required fields are marked *

I accept the Terms and Conditions and the Privacy Policy * for Click to select the duration you give consent until.

This site uses Akismet to reduce spam. Learn how your comment data is processed.

Primary Sidebar

Hi! I'm Jill McSheehy and I'm so glad you stopped by! If you're a beginning gardener needing help getting started or an everyday gardener looking for new ideas, you're in the right place!

You'll find gardening articles, The Beginner's Garden Podcast, and more!

To learn more about me and follow along in my journey, visit "Meet Jill" here, and subscribe above for instant access to all of my free gardening downloads, plus my Friday e-mail full of relevant gardening tips and ideas to help you grow your best garden!

From the Shop

Learn More

Most Popular Posts

  • 7 Common Mistakes in Raised Bed Gardening
  • 3 Raised Bed Soil Mixes Compared
  • Growing Blueberries? Avoid these 4 Beginner Mistakes
  • Is Indoor Seed Starting Right For You?

Categories

Follow Me on Instagram

Notice a difference between the cabbage seedlings Notice a difference between the cabbage seedlings on the left and the ones on the right?
.
.
I just love testing different things in my garden, and for these seedlings I tested two treatments I’ve never tried before: foliage feeding and a “root dip” using the plant growth product, Organic REV.
.
.
The plants on the left were untreated; the ones on the right were treated.
.
.
A few weeks ago I filled a spray bottle with a diluted Organic REV mixture (per their instructions) and I sprayed the young seedlings on the right. They responded well and began to outpace the untreated group slightly — it was small but definitely noticeable.
.
.
Then last Friday I transferred the seedlings into these larger pots, but before I did it, for the plants on the right, I dipped the root ball in a 50/50 REV/water mixture, saturating the soil and roots before transplanting. Again, the plants on the right were the only ones that got this root dip.
.
.
The soil all plants are growing in is the same: a potting mix plus some Plant Tone organic fertilizer.
.
.
It was after this root dip and transplant that the seedlings on the right started pacing much more ahead of the ones in the untreated group.
.
.
While all the seedlings (treated and untreated) are growing in this fertile soil medium, what Organic REV is supposed to do is appearing to prove true — at least in this test. It helps plants more efficiently take up and use the nutrients that are present in the soil.
.
.
.
.
Organic REV is now a brand partner of the Beginner’s Garden. They sent me their product to try first, and I’m continuing to test it in different ways.
.
.
But what I’m sharing with you is my own experience and results. If you’re interested in their product, look them up here: @buyorganicrev Use my affiliate code JILL10 to get 10% off if you want to try it for yourself.
.
.
.
.
#organicrev #foliarfeed #foliarfeeding #indoorseedstarting #indoorseedlings #pottingup #cabbage #cabbageseedlings #organicgardening #organicfertilizers
I don’t know if I’ll ever get used to harvesti I don’t know if I’ll ever get used to harvesting from my garden in the winter. It snowed today, even! (Okay, just a dusting, and it already melted, but in central Arkansas, any snow is worth celebrating! 😂)
.
.
Although I’ve grown cabbage in the spring before, this is my first time harvesting a fall crop. (My last two attempts were thwarted by hungry rabbits or rogue hens 😡.)
.
.
I have several more plants that I’m hoping to harvest from now that the days are getting longer and maybe the heads will start growing again. And I also have a new crop started in my grow room.
.
.
Four-season gardening may sound daunting but I assure you, fall and winter gardening is almost a hands-off endeavor. The only thing it really takes is a little planning (and some nurturing in the beginning).
.
.
And the reward of picking from your garden in the winter (when your climate allows) can’t be overstated. It’s fabulous!!
.
.
If you’re interested in learning how to incorporate more seasons in your garden growing, I have several exciting new resources coming up, starting with tomorrow’s first podcast of the new year on deciding if indoor seed starting is right for you!
.
.
As much as I’m enjoying this winter harvest, I’ve already got one eye in spring! You, too? 😊
.
.
.
#cabbage #growingcabbage #wintergarden #winterharvest #zone7b #arkansasgarden #zone7gardening #gardenplanning
This fall-planted parsley 🌱 has done really wel This fall-planted parsley 🌱 has done really well in my Greenstalk Vertical planter. I recently harvested the lower leaves and dried them for use in the kitchen. But the rest of the plant is still growing well, and I expect to harvest from it for months to come.
.
.
I planted the parsley along with other plants in the Greenstalk planter in September. Although the lettuce is done and I harvested the celery, the herbs like parsley, cilantro, chives, and oregano are going strong!
.
.
I LOVE that I don’t have to buy almost all herbs from the store, even in the winter.
.
.
.
.
#herbs #parsley #herbgardening #greenstalkplanter #greenstalkverticalplanter #containergarden #containergardening #containerherbgardening #wintergarden #winterharvest #winterherbs #zone7b #zone7gardening
I’ve spent the better part of two days selecting I’ve spent the better part of two days selecting and ordering seeds for this year. My husband thinks my intensive research is a bit over the top. Maybe.... 🤔
.
.
But here’s what I do:
.
1️⃣ Select the seed companies I’ll purchase from. Most of my orders were from @southernexposureseed because I’m in the SE US and the varieties there fit my climate well. Next, I placed a large order from @territorialseedcompany (great selection, informative catalog, and some of the best prices). From there, I supplemented with seeds from @bakercreekseeds (high quality heirloom seeds, highly dependable, free shipping), @johnnys_seeds (unique varieties for different needs than I can get elsewhere), and @seed_savers_exchange (heirloom seeds with a great mission).
.
.
2️⃣ I went through my top 3 catalogs, circling varieties I was interested in.
.
.
3️⃣ I entered each variety in my Seed & Plant Research sheet from my Complete Garden Planner, noting unique characteristics, days to maturity, and price. (Not all seed packets are equal in quantity so it pays to be a savvy shopper.)
.
.
4️⃣ I chose which seeds to purchase.
.
.
I usually plan my entire garden before ordering seeds, but I was a bit nervous about the seed supply (thankfully only a few varieties were sold out), so I did my best in choosing what I’d need.
.
.
The process was LONG but a great way to spend the last two days of 2020 — with HOPE for the 2021 garden season! 💕
.
.
Have you ordered seeds yet? Where do you like to order from?
.
.
(My printable Complete Garden Planner is available in my shop, link in profile.)
.
.
#seedshopping #orderingseeds #gardenseeds #garden2021
#gardenplanning #gardenplans #seedcatalog #seedcatalogs #wheretobuyseeds #gardening #gardeningtips #gardentips
My greenhouse lettuce is coming along! 🥬 I expe My greenhouse lettuce is coming along! 🥬 I expect now that the day length ☀️ will be increasing, the growth will accelerate in the next couple of months.
.
.
I think I planted these in early October, so you can see how slow they grow this time of year, even in the warmth of the greenhouse. But it’s so nice to see signs of growth and hope for future lettuce harvests! 🥬
.
.
I’m almost to the end of my main fall lettuce, so I’ll be glad when these are ready to eat!
.
.
#lettuce #greenhouse #greenhousegardening #wintergarden #wintergardening #greenhouselettuce #falllettuce #growbag #growbags #greenhousegardener #containergardening #containergarden #containerlettuce
Would love to hear your personal experience using Would love to hear your personal experience using shredded leaves as mulch! 🍂
.
.
🌲 The trees on my property are mainly pine trees, so I’ve never had fallen leaves to collect and use as mulch. (That’s mainly why I use wood chips.) But when my dad offered to collect and bag up his leaves and give them to me, of course I said yes!
.
.
Twenty-five bags later I realized I needed to figure out how to best use them. I knew they’d blow away if I just dumped them on the garden and they’d take forever to break down if I threw them in the compost pile. So I watched a few YouTube videos and settled on a leaf shredder.
.
.
(A lot of people use lawn mowers to mulch their leaves but we don’t have a mower like that. I also tried the weed-eater as an immersion blender in a trash can idea once and it was a disaster.)
.
.
I LOVED this leaf shredder! It was really easy to use and I shredded 25 bags in just a couple of hours. Most people shred the leaves into bags but I created a simple wired bin to collect mine, and I shredded the leaves directly into it. I applied the leaves to several beds already but I have half of them still in the bin to use later.
.
.
How do you use fall leaves in your garden? I’m excited to try this method that I have enviously watched so many gardeners use over the years!
.
.
.
#leafshredder #leafmulch #leafmulching #leafmulcher #fallenleaves #autumnleaves #mulch #gardentips #fallgardening #gardenchores #compost #leavesasmulch #fallgardencleanup @worxtools
Follow on Instagram

Join Me on Facebook

Join Me on Facebook

Footer

Disclosure:

Some links on this site are affiliate links, which means I may receive a small commission if you purchase products I recommend. This does not cost you any more but does help me offset some of the costs associated with this blog. I only promote items I personally recommend and think provide benefit to my readers. Journey with Jill is a participant in the Amazon Services LLC Associates Program, an affiliate advertising program designed to provide a means for us to earn fees by linking to Amazon.com and affiliated sites.

Read my Privacy Policy, Disclaimer, and Terms of Use.

Stay Connected

  • Facebook
  • Instagram
  • Pinterest
  • Twitter
  • YouTube

Copyright © 2021 Jill McSheehy | Design by The Design Diva | Development by MRM