
How to Plant Tomatoes in 11 Easy Steps
When I first started gardening, the hardest information to find was the most basic, such as how to transplant the tomatoes I had just bought from the garden center. Everyone, it seemed, already knew. But I still had many questions. How deep should I plant them? Do I use fertilizer? What staking system should I use?
Last week I began transplanting my own tomatoes. Whether you grew yours from seed indoors or are purchasing them from a garden center, the tips below should help you get your tomatoes off to their best start.

Step 1: Gather Your Supplies
Before you get started, you want to gather your supplies:
- Hand shovel
- Compost
- Tomato Tone organic fertilizer (you can get this at most garden centers, Wal-Mart, or online)
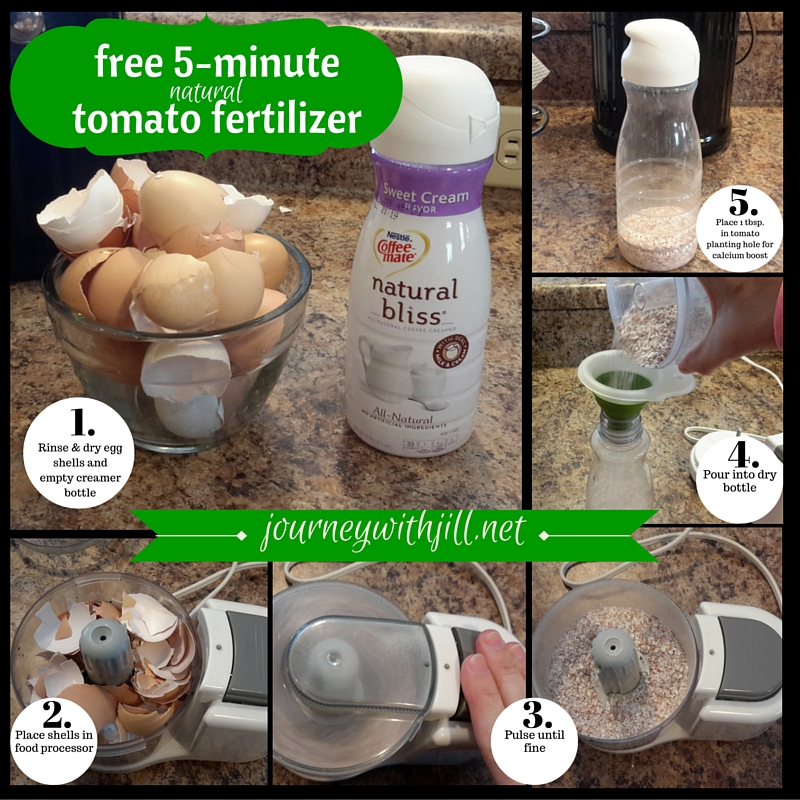
- Crushed Egg Shells (optional, but I recommend it)
- Watering can with water
- Toilet Paper Rolls, sliced in half vertically and horizontally
- Tomato stakes
- Hammer
- Gardening gloves (optional)
- Kneeling pad or stool (optional)
Step 2: Dig a Hole
If your soil is pliable, take your hand shovel and begin digging a hole. Tomatoes, in particular, need to be planted deep. Depending on how tall your transplants are, you may need to snip the bottom leaves. That’s okay, as long as the primary leaves on top are above the soil. The stem will form roots, enabling more nutrients and water to get to the plant. The goal is for the top leaves to be only a few inches out of the ground.
Dig a little deeper than you think, to make room for the amendments listed next.
Step 3: Add compost, fertilizer, and egg shells
A little goes a long way. Add a handful of organic compost, a half handful of Tomato tone or other organic fertilizer, and a couple of tablespoons of crushed egg shells to the planting hole.
Step 4: Add water
Fill the hole with about 2-3″ of water. This will encourage the new roots to grow downward. If your soil is especially slow-draining, you may need to add more if the water doesn’t stand in a pool for a few seconds.
Step 5: Remove transplant from container
Remember, your baby tomato transplant is just a baby, and not treating this step with care could damage it. If you’re right-handed, hold the transplant container in your left hand and gently squeeze the bottom of the individual cell (that holds one tomato plant) on all sides, loosening the soil from the edges. With your left hand situate the stem between your index and middle fingers, fingertips pressed against the container. Gently, turn the container upside down, continuing to squeeze the individual cell with your right hand, until the transplant begins to fall into your left hand. You may have to gently coax it out with your left hand, but use extra care and do not tug at the stem.
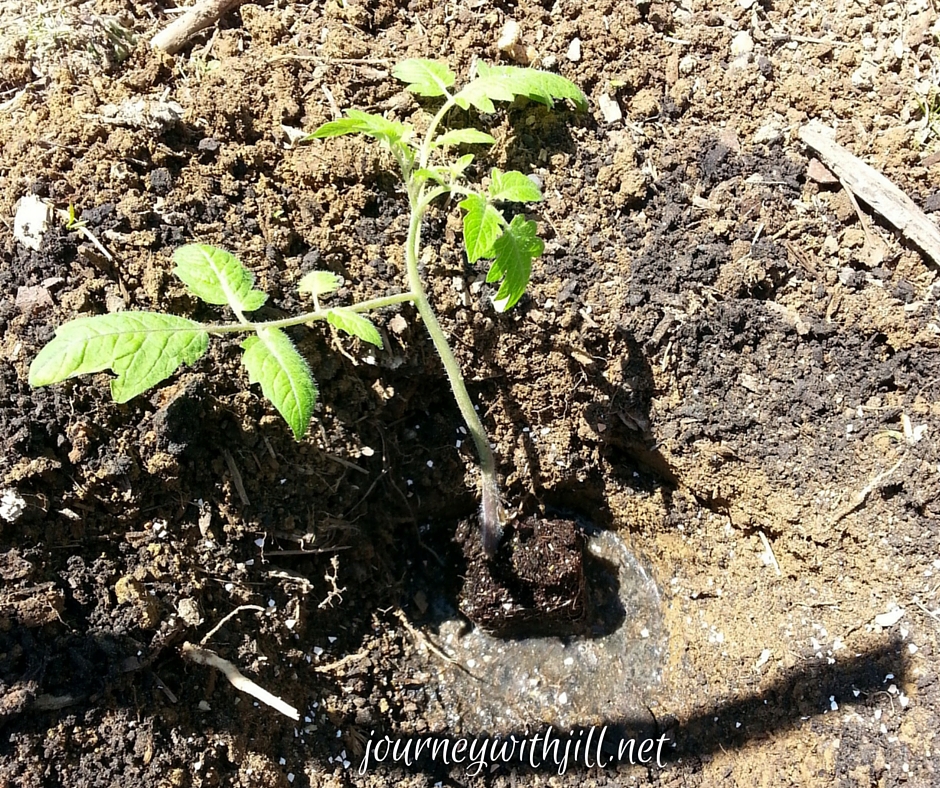
Step 6: Place transplant in hole
There are two methods to this. One is to plant it deep, roots facing down and plant facing up. The other is to place the transplant in the hole at a 45 degree angle, with the plant facing the horizon.
I’ve tried both, and they’ve both turned out well for me. The logic to the second option is the stem, which puts out new roots, will have easy access to nutrients in the topsoil and quicker access to water. Within a day or so the transplant uprights itself toward the sun.
In my non-expert opinion, I recommend planting at the 45 degree angle only if your soil is not well-draining. This method lends itself to a less deep planting, and it’s less likely to get bogged down in heavy rains. If your soil drains well (or too well), planting deep is a good idea, as those deeper roots will have better access to water reserves during the times of year with little rain and hot weather.
Step 7: Back-fill with soil
After you get your baby transplant situated, gently back-fill the hole with the soil you dug out. Pause when the dirt is almost back at ground-level.
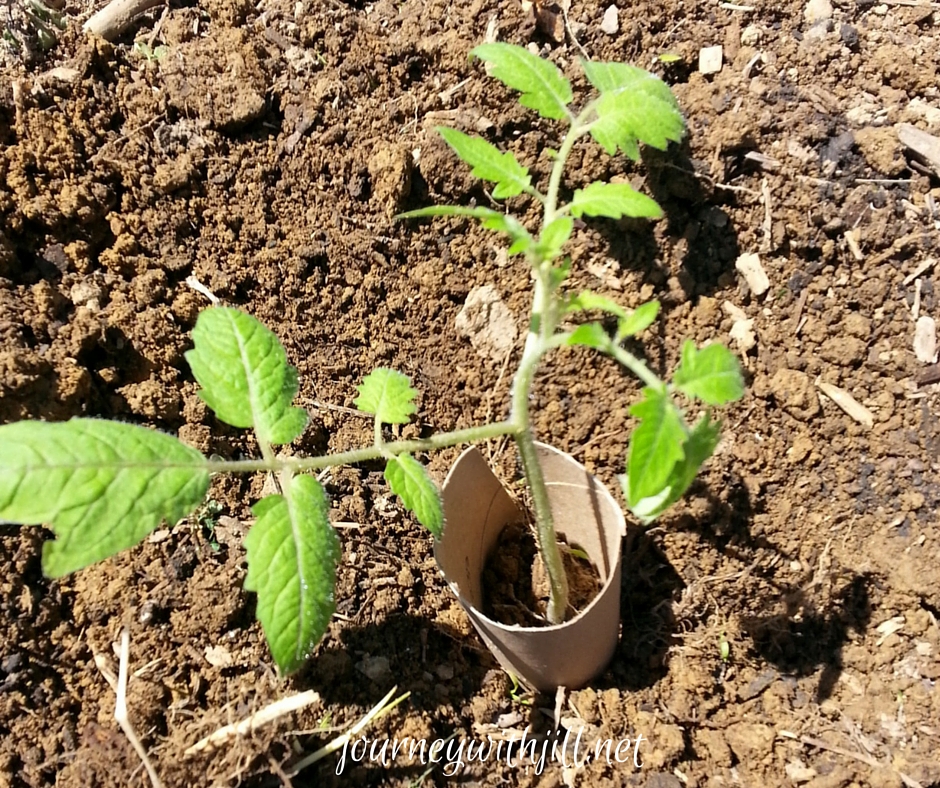
Step 8: Wrap stem
Take your half of a toilet paper roll, and situate it around the stem, pushing it gently into the soil about 1/2 inch. This is to protect the stem from cutworms, which eat through the stem where it meets the surface of the soil.
Step 9: Water thoroughly
Water the new transplant, both to encourage growth and to flood out air pockets. Don’t allow the tomato plant to sit in a pool of water; simply water enough until the ground is saturated. (If you expect a rain the following day, water only a minimal amount.)
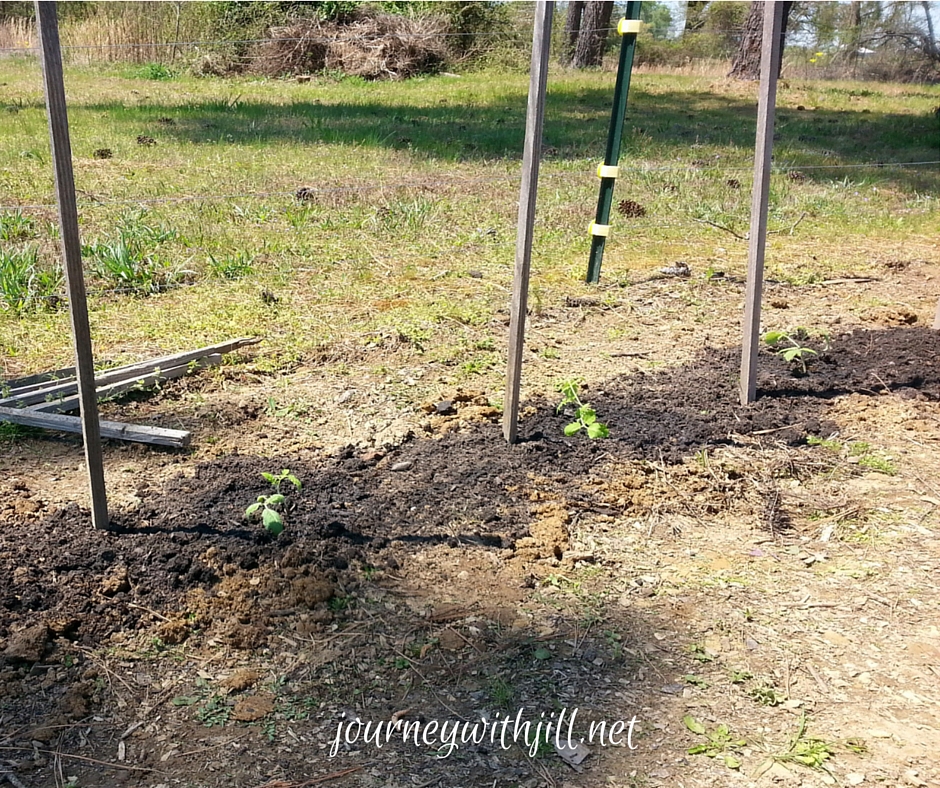
Step 10: Install tomato stakes
I will share how I stake my tomatoes in another post, but it’s helpful to place the stakes in the ground now. Not only will it prevent root damage that can occur from staking your tomato after it has grown, but it will also save you this extra step later.
Each transplant will need to be flanked by two tomato stakes. That means, for four transplants in a row, you’ll need 5 tomato stakes (the interior ones will share a stake).
You can view a video I made showing how I stake my tomatoes. (This will need to be done when the plants get about 12″ high and then every 6″ after.)
Depending on the tomato variety, plant transplants 2 to 3 feet apart. I have had success planting mine in double rows, which means I plant one row, then plant another row 2-3 feet from the first row, and I stagger the second row compared to the first. This gives me access to pick the tomatoes from one side of each row, and intensively planting two rows of tomatoes together discourages weed growth between them. Plus, It makes drip irrigation (or using a soaker hose) easier, since one line can water both rows at once.
Step 11: Add mulch
Mulch is important to discourage weed growth. Three to four inches deep is necessary. However, tomatoes do well with warm soil. Therefore, I delay adding mulch until about a month after my last frost date. Until then, it’s unfortunately necessary to hand-weed. I usually use wood chips, though this year I will be experimenting with hay.
I hope these steps will get you on your way to a bountiful tomato harvest!
Do you get overwhelmed with garden planning?

Subscribe here for my best tips to plan your garden in just 7 days -- all for FREE.
Plus, I'll send you my "In the Garden E-mail" on Fridays, periodic updates on garden resources relevant to you, and you'll receive access to my entire bank of free garden downloads!
You are also agreeing to our privacy policy.
You given tips helps lot, thanks for sharing it. I have tried earlier but their size are very small. Hope using your tips grow better.